Showing posts with label materials. Show all posts

Sunday, 6 March 2016

The Knitting and Stitching Show

All the wool!
On Friday I took the day off work to visit the Knitting and Stitching show at Olympia.  I wasn't sure what to expect, but I was hopeful of seeing some nice things.  I was not disappointed!
One of Edward's Menagerie from TOFT
It was great to see so many different suppliers, many of which I already knew from the web.  Companies like Tilly and the Buttons, TOFT, and Black Sheep Wools, while meeting some great new companies too.

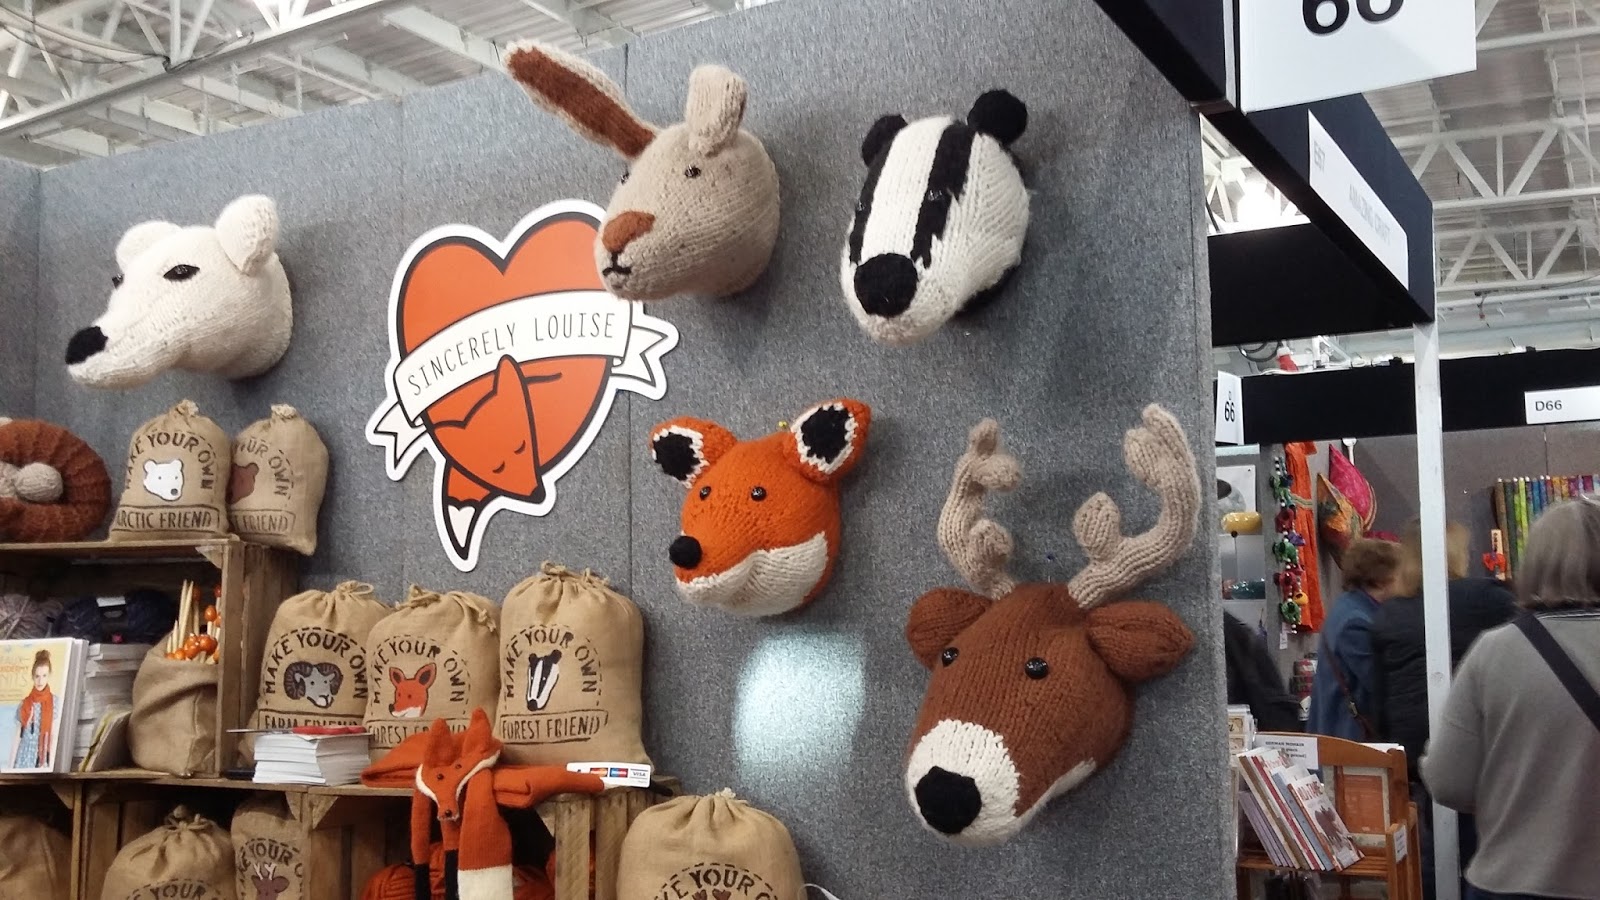
Animal heads from Sincerely Louise
Frida's Flowers Blanket by Janie Crow
A Crochet scarf kit by Janie Crow
The only problem was there was so much to see and buy!  I could easily have picked up supplies and patterns for enough projects to keep me busy for the next 5 years!  (never mind the list of projects I currently have.)

Floss & Mischief's vending machine
 In the end I had to make a choice between a lovely crochet scarf kit from Janie Crow or a bear making kit from Amazing Craft.  Cyril the mohair bear won.  I love bears and he is so cute, while I'm not sure my crocheting skills are ready for the scarf kit yet, maybe next year.

Cyril the mohair bear from Amazing Craft
Latvian mittens by Hobbywool
City map needlepoint kits by Hannah Bass
Crochet necklace of mice from Pretty Sisters
But while there was lots of things to buy and to make, there were also classes where you could learn how to make all sorts of things, and galleries of art works including quilts by The Quilter's Guild and these amazing knitted Nikes.
I had a grand day and think I'll be going back next year, but this time I will have a very long list of things I want!

Knitted Nike's by Jessica Dance

Thursday, 5 March 2015

Storage


I don't know about you, but if you are anything like me you will have boxes of things that you can't throw out 'cos they might be useful for a project one day.  Of course I then forget what I've got and end up not using any of it (or buying more - don't tell 'im outdoors).
So imagine my delight in receiving this as a present recently.  This box must have been designed by someone who has this exact same problem.  With a nice big area underneath for bigger stuff and then lots of small compartments on top and at the sides for the little stuff it really is a work of art in itself.  The fact you can pick it up like a suitcase and everything is still nice and secure just adds to the list of positives.
I spent a lovely afternoon rediscovering my crafting stash and now its all tidy and just waiting for my next project.  Brilliant.

In case you want one its call a Kaboodle Plus.

Friday, 16 January 2015

Metal folder


I know this makes me kinda sad, but I'm all excited about a new tool I've bought and can't wait to use.
Its from elbel libro - who ran the onion skin binding workshop which I attended in October.
Ben the tutor had one (he makes them) and I wanted one as soon as I saw it.  It's a lovely weight, with good grip and a perfect point - just the sort of thing I could have done with when making my paper models.
He didn't have any more in October, but he's just got more stock in so I got in there quick!  It is a thing of beauty and I think it will leave me wondering how on earth I survived without it.

Monday, 25 November 2013

Hobbycraft - a treasure trove?

Yesterday we went to Hobbycraft.  It was my first ever visit and I was blown away by it.

All my life I have spent collecting materials for making stuff; sometimes out of the bin – cereal boxes or paper that’s only been printed on one side; or from one of my dad’s sheds; or from wonderful tiny art shops where everything you could think of is crammed into this tiny space; or while I was at art college from the old department store across the road from the college who had a great haberdashery department; or even from somewhere like B&Q.

Every project has needed a plan just to get the materials, especially as the wonderful art shops are closing down and I’ve moved to a different location.  So to walk into one big store and find pretty much everything I’ve ever dreamed of and a bunch more is amazing and in away a little scary.

I love those little art shops, you know the one’s where you have to be careful when you turn round that you don’t wipe out a whole display, but they are definitely on the decline and with a store like Hobbycraft around I suddenly understand why. 

So I have mixed feelings about it.  Part of me is amazed at all the wonderful things on offer and I’d happily go back and spend another couple of hours looking round, while on the other hand I would rather spend my money in one of those little shops in the hope that they will continue to exist for a bit longer.  The problem is with the items that the little art shops just don’t have the room to stock.  Where else could I have got the length of balsa wood or the star cutting stamp that we picked up yesterday except maybe the internet?

I think I will have to add it to my list of possible suppliers but just make sure I start with the tiny independent shops first.

Wednesday, 31 October 2012

Play Dough

This weekend after a month of Lola I've got my first Day School.  I'm pretty excited; the list of things to bring didn't include one book, unless you count a sketch pad!  One of the suggested things to bring was some play dough, and as I'm always up for learning new things, I had a go at making my own.  There are loads of recipes on the web but I liked this one best as you don't have to cook the dough.  It was mega easy to make and maybe next time I'll add some glitter.

Friday, 11 March 2011

Wallpaper


If you’ve been reading this for a while you will know that I quite like wallpaper.  Mostly because it’s thick and great for covering my hand made books, but also because it comes in some really wicked designs.
Anyway I was in a pub about 6 months ago when I visited the loo only to find one wall covered in the most beautiful wallpaper.  After a brief moment of wondering how best to remove the paper from the wall, I did the next best thing and took its photo.  (Several people have been bored with this photo.  Sorry)
Imagine my delight then, when I found the very same wallpaper in a DIY store down the road from the flat this week.  I actually had to get my phone out and check it against the photo I had taken, and there is no doubt – it’s the same paper.  Look out for a hand made book covered in this design, coming soon (Easter?).

Sunday, 12 April 2009

Knit One, Purl One

As if I don’t have enough to do right now, I’ve got the sudden urge to learn to knit again. My dad taught me when I was little and my mum helped me out when I got stuck, but I haven’t done any for years.
Then I was browsing on Etsy I came across some really lovely patterns, particularly one for a bear and one for a bag, and the urge came on me, not just to be able to knit, but to actually make something from my knitting that isn’t a scarf.
Luckily my friend Katie, who always seems to have a ball of wool and at least one set of needles with her, was most obliging on Friday afternoon, and patiently showed me what to do. Once I’d been reminded my fingers seemed to remember what was needed. Above is what I’ve done so far. Practice makes perfect after all. Katie also suggested the learn2knit website, which has some excellent diagrams on how to knit. Once I’m happy that I can do it right, I shall have a go at the bear I think. Of course that will mean learning to read knitting patterns!
Watch this space.

Sunday, 5 April 2009

The Naked Book

I finished my Mindfulness course this week. It was really interesting and I’ve learnt a lot. Now I just have to remember to use what I’ve learnt in my day to day life.


Now I’ve finished the course I’ve got more time to do all the other things I like to do. One of the first things I’ve done is make a new book.
I call it the ‘naked book’ as there really isn’t any sort of cover and no spine (its based on something I saw in a shop a couple of months ago). This one is very rough to see if it would work, so it’s a bit gray. But I think if the card covers were covered in some pretty paper, and if the spine material was again a pretty colour then it wouldn’t look to bad. I was worried about how well the covers would attach – you don’t want them to come off, but they feel pretty secure, so I’m happy with this. I shall have another go, but make it more decorative.

Friday, 27 February 2009

Stamp and Logo


I have to admit to being rather excited right now!
Nope I didn’t make it into the final 50 applicants for ‘the best job in the world’, and I’m not aware right now of anyone wanting to publish one of my stories; this is something far better.
Finally with a lot of help from my Dad I have finally worked out a way to mark my books as mine. It’s taken maybe 4 months to get to this stage, but the end result is worth it!
Basically I wanted to be able to mark my books as mine but without using stickers which I think look a little naff, and come off way to easily; or having to write something on everyone. I wanted something which would constantly look the same on anything I do.
I started by drawing myself a logo using the words ‘Wild Creations’ as this is what I call my self. But how to get it on to the books?
Talking to my Dad we came up with the idea of making a stamp which would emboss the paper or card with the design. This was just what I wanted.
It took a while to get the materials and technologies together but my Dads knowledge of circuit board printing really helped.
And finally I have a working stamp. It’s better than I’d hoped for – remember that I had to draw it onto the metal by hand, backwards! So to have it stamp so well has made me really pleased. I just need to practice stamping now, so I don’t do it too hard or not hard enough.
The idea of opening my own Etsy shop now seems real instead of a dream. Much more to do, but nothing I can’t do given a little time.

Thursday, 22 January 2009

Linden Avenue Designs

Sorry I’ve been quiet this week. The students started back for the spring semester on Monday, so I’ve been running round with timetables and registration forms, with no time to be creative.

Aren’t these just the prettiest beads? They have just arrived from Texas, where MaryAnn makes them all by hand. I found them on her etsy shop Linden Avenue Designs (you can find her on my etsy favourites below), and to be honest I think I could quite happily buy the whole shop. I love the colours and the variety and I’m really looking forward to using these beads. I can feel a necklace coming on.
It’s a shame I have to work, I’ve got so many things that I’d like to do at the moment. Watch this space.

Sunday, 21 December 2008

Precious stones

In July this year I went to the Rock and Gem Show. There I found some lovely beads that I made into necklaces, which I have been meaning to post up here for ages. The problem has been getting photos of them that I like. Finally with the help of ‘im outdoors I have succeeded. So here they are.
The first is rock crystal or quarts. This is my favorite. I love the feel of the stone and the way they look like plastic or glass but aren't.

The second is amethyst, which can look black without any sunshine to light it.


The last is fluorite blue, which actually looks green normally. I also love this necklace as I think the colour is wonderful and its very light to wear.

I hope to find more great beads at the next Rock and Gem Show, when ever that is.

Thursday, 16 October 2008

Starch Paste

I’ve just made my self some glue or to be more precise some starch paste. It’s very easy and I’d love to make all my books using homemade starch paste instead of PVA, but the paste only lasts about 3 days in the fridge before starting to grow stuff.
Anyway there are certain things which I just can’t use PVA on, for instance material, so I’ve been saving them all up and I’m going to try and make them all this weekend.

To make starch paste you just need some plain white flour and some water.
Get a bowl and about 2 tea cups of the flour. Add water until you have a dough which, to quote the guy who taught me to make this, 'is of an ear lobe consistency’. Then you fill a small milk pan half full of water and pour that into the bowl with your dough. Knead the dough gently for about 5 minutes – it will have fallen apart by this point and all the starch will be released into the water, the glutton will be at the bottom of the bowl.
Pour your mixture into the milk pan through a sieve to get rid of all the glutton and then comes the tricksy part.
You need to gently heat the mix, while stirring constantly for 10 minutes plus. The longer you heat and stir the better the glue. You must not boil or burn the mix or you have to give up and start again. At about the 10 minute mark the watery mix should start to thicken and if you’ve got it right you end up with a pale looking custard.
Pour it into a container and keep in the fridge.

Depending on the amount of water and how long you heat it will depend on how thick and strong your glue is. And of course this glue is totally safe with children as its just starch.

To use the paste, scoop a bit out of your container and put it on a flat hard surface, a clean baking tray is good for this. Then use a paint brush and brush it out flat. When it doesn’t feel lumpy any more you can use it. Don’t worry if there is the odd lump in the paste – it will dry flat.

Good luck!